LAPTOP • DAILYTECH.ID - Learning how to screenshot laptop keyboard shortcuts is a fundamental skill in today’s digital world. Whether you’re capturing an error message for tech support, saving an important part of a document, or sharing a funny moment from a video, knowing these quick methods can save you a lot of time. This guide will walk you through the simplest and most effective ways to take screenshots using just your keyboard, ensuring you can capture exactly what you need, when you need it.
No matter if you’re using Windows or macOS, there are built-in keyboard shortcuts designed to make screen capturing a breeze. Forget about needing third-party software for basic tasks; your operating system has you covered. We’ll explore the various options, from capturing the entire screen to just a specific window or a custom selection.
By the end of this article, you’ll be a screenshot pro, able to quickly and efficiently grab any part of your screen with just a few keystrokes. Let’s dive into the various keyboard combinations that will unlock your screenshot potential.
Understanding Keyboard Screenshot Basics
Before we get into the specifics, it’s helpful to understand the different types of screenshots you might want to take. Generally, there are three main categories:
- Full-screen screenshot: Captures everything visible on your display.
- Window screenshot: Captures only the active window you’re currently working in.
- Partial or custom screenshot: Allows you to select a specific area of your screen to capture.
Each of these has its own dedicated keyboard shortcut, making it easy to choose the right tool for the job.
How to Screenshot on Windows Laptops Using Keyboard Shortcuts
Windows offers a robust set of keyboard shortcuts for taking screenshots, catering to various needs. These methods are universally available across different versions of Windows, including Windows 10 and 11.
Capturing the Entire Screen with Print Screen
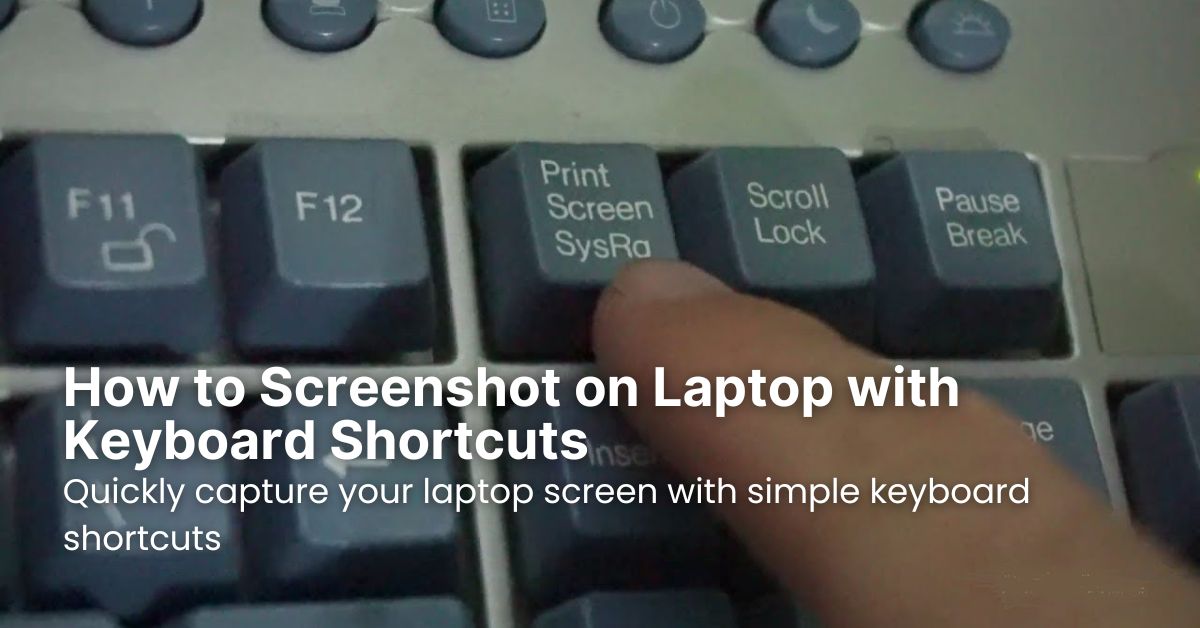
The most common and straightforward way to screenshot laptop keyboard on Windows is by using the Print Screen key.
- Print Screen (PrtSc, PrtScn, or Prt SC): Pressing this key usually copies an image of your entire screen to your clipboard. From there, you can paste it into any image editor (like Paint), a document (like Word), or an email.
- Tip: Sometimes, this key is labeled “PrtScn” or “Prt Sc.” It’s typically located in the upper-right section of your keyboard, near the F12 key.
Saving Full Screenshots Automatically with Windows + Print Screen
If you want to save your full-screen screenshot directly as an image file without pasting it, combine the Windows key with the Print Screen key.
- Windows key + Print Screen: This combination will dim your screen momentarily, indicating that a screenshot has been taken. The image is automatically saved as a PNG file in your “Screenshots” folder, which is located within your “Pictures” library. This is a super handy way to quickly archive multiple screenshots.
Taking a Screenshot of an Active Window with Alt + Print Screen
Sometimes, you only need to capture a specific program or window you’re working on, not your entire desktop. This is where the Alt key comes in handy.
- Alt + Print Screen: With the desired window active (make sure you’ve clicked on it to bring it to the forefront), press Alt + Print Screen. This will copy only that active window to your clipboard. You’ll then need to paste it into an application to view or save it. This method is great for focusing on specific application content without capturing background clutter.
Capturing Custom Areas with Windows Key + Shift + S
For ultimate flexibility, Windows includes a built-in tool called Snip & Sketch (or the Snipping Tool in older versions), which can be activated with a simple keyboard shortcut. This allows you to select a precise area of your screen.
- Windows key + Shift + S: Pressing these three keys together will dim your screen and bring up a small toolbar at the top of your display. You’ll then have several options:
- Rectangular Snip: Drag your mouse to select a rectangular area.
- Freeform Snip: Draw any shape around the area you want to capture.
- Window Snip: Click on a specific window to capture it.
- Fullscreen Snip: Capture the entire screen (similar to Print Screen).Once you make your selection, the image is copied to your clipboard. A notification will also pop up in the bottom-right corner, allowing you to open the Snip & Sketch app to edit, annotate, or save your screenshot. This method is particularly useful when you need to capture a specific section of a webpage or document. If you’re looking for more ways to capture your screen, you can also explore how to screenshot laptop with other methods.
Using the Game Bar for Screenshots
If you’re a gamer or simply want another option, the Xbox Game Bar in Windows 10 and 11 also has screenshot capabilities.
- Windows key + G: This opens the Game Bar overlay. From there, you can click the camera icon to take a screenshot. These screenshots are typically saved in your “Videos/Captures” folder. While primarily for gaming, it’s a legitimate way to capture your screen in any application.
How to Screenshot on Mac Laptops Using Keyboard Shortcuts
macOS provides an intuitive and powerful set of keyboard shortcuts for taking screenshots, offering various levels of control. These methods are consistent across different MacBook and iMac models.
Capturing the Entire Screen with Command + Shift + 3
The quickest way to capture everything on your Mac’s screen is with this combination.
- Command (⌘) + Shift + 3: Pressing these three keys simultaneously will capture an image of your entire screen. A thumbnail of the screenshot will briefly appear in the bottom-right corner of your screen. If you do nothing, it will automatically save to your desktop as a PNG file, usually named with “Screen Shot” followed by the date and time. This is the go-to for full desktop captures.
Capturing a Selected Portion of the Screen with Command + Shift + 4
For more precision, macOS allows you to select a specific area to screenshot.
- Command (⌘) + Shift + 4: When you press these keys, your cursor will change to a crosshair. You can then click and drag a box around the area you want to capture. Once you release the mouse button, the selected area will be captured and saved to your desktop as a PNG file.
- Tip: While dragging, you can hold the Space bar to move the selection area, or hold Shift to resize it proportionally. This level of control makes it easy to get exactly what you need without cropping later.
Capturing a Specific Window with Command + Shift + 4 + Spacebar
This is a fantastic shortcut for capturing clean images of individual application windows without any background elements.
- Command (⌘) + Shift + 4, then press Spacebar: After pressing Command + Shift + 4, your cursor will turn into a crosshair. Now, press the Spacebar. The crosshair will change into a camera icon, and as you move it over different windows, those windows will be highlighted. Click on the window you want to capture, and a screenshot of only that window will be saved to your desktop. This is ideal for sharing application interfaces or specific document views.
Using the Screenshot Toolbar with Command + Shift + 5
For an all-in-one screenshot solution on macOS (Mojave and later), use the screenshot toolbar. This provides visual controls for all screenshot types and screen recording.
- Command (⌘) + Shift + 5: This shortcut opens a small toolbar at the bottom of your screen with various options:
- Capture Entire Screen: (Icon looks like a full screen)
- Capture Selected Window: (Icon looks like a window)
- Capture Selected Portion: (Icon looks like a dashed rectangle)
- Record Entire Screen: (Icon looks like a solid circle)
- Record Selected Portion: (Icon looks like a dashed circle)You can click on your desired option, then follow the on-screen instructions (e.g., drag a selection, click a window). This toolbar also offers “Options” where you can choose where to save your screenshots (Desktop, Documents, Clipboard, etc.) and set a timer. This comprehensive tool covers almost every screenshot need. Learning about how to master these shortcuts can significantly boost your productivity.
Tips for Effective Screenshotting
Beyond just knowing the shortcuts, a few tips can help you get the most out of your screenshot efforts, especially when dealing with your laptop screen.
- Clean Up Your Desktop: Before taking a full-screen screenshot, consider closing unnecessary applications or minimizing desktop icons for a cleaner image.
- Use Annotations: Once you’ve taken a screenshot, especially on Windows with Snip & Sketch or on Mac with the screenshot toolbar, take advantage of the built-in annotation tools. You can highlight, draw arrows, or add text to point out specific details.
- Consider File Formats: While most operating systems default to PNG (which is great for retaining quality), sometimes a JPEG might be more appropriate for smaller file sizes, especially if you’re emailing many screenshots. You can often change the default format in your system settings or when saving in an image editor.
- Organize Your Screenshots: If you take a lot of screenshots, consider creating a dedicated folder for them to keep your “Pictures” or “Desktop” folder tidy. This is especially true if you are often taking a screenshot without print screen.
- Practice Makes Perfect: The more you use these keyboard shortcuts, the more they will become second nature. Try taking different types of screenshots to familiarize yourself with each method.
Troubleshooting Common Screenshot Issues
Sometimes, you might encounter small hurdles when trying to screenshot. Here are a few common issues and their quick fixes.
- Print Screen Key Not Working: On some laptops, especially compact models, the Print Screen key might require you to also hold down the Fn (Function) key. So, try Fn + Print Screen or Windows key + Fn + Print Screen. This is quite common for laptop keyboards where keys have dual functions.
- Screenshots Not Saving: Check your default save location. On Windows, ensure your “Screenshots” folder exists and has the correct permissions. On Mac, check the “Options” in the screenshot toolbar (Command + Shift + 5) to see where your screenshots are set to save.
- Screenshot Goes to Clipboard, Not File: Remember that many Print Screen variations copy to the clipboard. You need to paste the image into an application (like Paint, Word, or an email) and then save it from there if you want a file. For direct saving, use the Windows + Print Screen (Windows) or Command + Shift + 3/4/5 (Mac) shortcuts.
- Screenshot of a Black Screen: This can sometimes happen with protected content (like streaming services) or certain full-screen applications. Try minimizing the application or using a different screenshot method. For protected content, it might be impossible to capture due to DRM (Digital Rights Management).
Conclusion
Mastering the art of taking screenshots with keyboard shortcuts is an invaluable skill for anyone who uses a computer regularly. It’s a simple yet powerful way to capture information, troubleshoot problems, or simply share moments from your screen. Both Windows and macOS offer a comprehensive suite of options, from capturing the entire display to precisely selecting a tiny region.
By familiarizing yourself with these key combinations, you’ll significantly improve your efficiency and workflow. No more fumbling for external tools or struggling with clumsy methods. Just a few quick presses, and your screen is captured exactly how you need it. So, go ahead, try out these shortcuts, and make screen capturing a seamless part of your digital life.